Enabling different LaTeX compilers in VS Code
January 26, 2022 Stardate: 75536.1 Tagged as: LaTeX
This post assumes you have already installed both VS Code and the extension LaTeX Workshop.
To use a different compiler you can either use a magic comment or define a recipe. The extension author warns “it is advised to use the recipe system instead of magic program to define the building process, since the latter is only implemented for backward compatibility.” I’ll describe both.
I needed to solve this because the FortySecondsCV class uses Academicons which doesn’t work when compiling with pdfLaTeX. So I needed XeLaTeX or LuaLaTeX but wasn’t fluent enough in VS Code.
Magic Comment
First, as of extension version 8.23.0, magic comments are disabled by default. You must go into your settings file and enable it.
// This allows magic comments
"latex-workshop.latex.build.forceRecipeUsage": false,
After this, defining a different compiler is as simple as placing a comment on the top of your root .tex file place the line:
%!TEX program = lualatexor
%!TEX program = pdflatexOther options are program = xelatex, bibtex, etc.
Recipes
The second method is fairly straightforward and is the recommended method. In your settings file you must define your “tools” and your “recipes” for using tools. This is how you can make complicated workflows like pdflatex -> biber -> pdflatex -> pdflatex (notice also it runs pdflatex twice at the end).
The tools definition is basically a command and arguments. Here are some examples:
"latex-workshop.latex.tools": [
    {
    "name": "lualatex",
    "command": "lualatex",
    "args": [
        "-shell-escape", //I can't remember why I needed this in the past
        "-synctex=1",
        "-interaction=nonstopmode",
        "-file-line-error",
        "-pdf",
        "-output-directory=%OUTDIR%",
        "%DOC%"
    ],
    "env": {}
    },

    {
    "name": "pdflatex",
    "command": "pdflatex",
    "args": [
        "-synctex=1",
        "-interaction=nonstopmode",
        "-file-line-error",
        "-output-directory=%OUTDIR%",
        "%DOC%"
    ],
    "env": {}
    },

    {
    "name": "biber",
    "command": "biber",
    "args": [
        "%DOCFILE%"
    ],
    "env": {}
    }
],
And then you can define the recipes. The “name” is just a label and the “tools” are what you want to call and what order. Here are some more examples.
"latex-workshop.latex.recipes": [
{
"name": "lualatex",
"tools": [
"lualatex"
]
},
{
"name": "pdflatex -> biber -> pdflatex TWICE",
"tools": [
"pdflatex"
"biber"
"pdflatex"
"pdflatex"
]
}
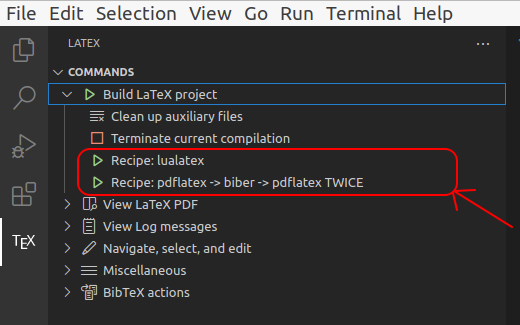
],Once you restart VS Code you can find your new recipes under the LaTeX command panel. Note that the first recipe is the default if you simply run “build project.”
Software Versions
This is an automated list of software versions used during the writing of this article.
Software Version Visual Studio Code 1.63.2 LaTeX Workshop 8.23.0 Ubuntu 20.04.3 LTS