Setup Google Domain for Github Pages
July 11, 2020 Stardate: 73991.9
So you are using github pages and want a custom domain name? This article will explain how to configure the DNS records to make that possible.
Github Settings
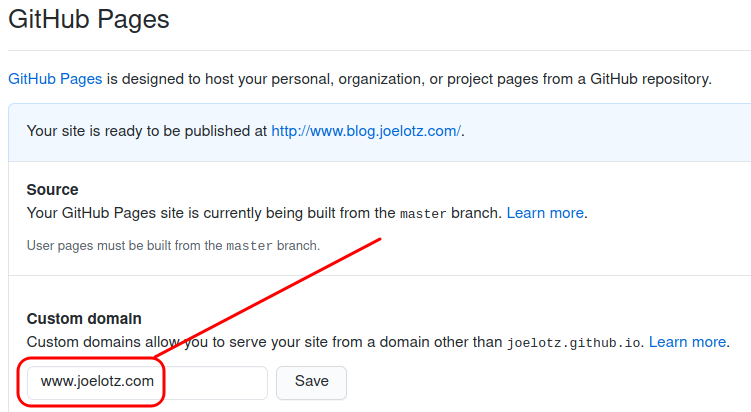
First, go into your github pages repository and select the Settings. Note that your github pages is probably something like <yourname>/<yourname>.github.io.

Scroll down until you see “custom domain” and then enter the domain you purchased from Google Domain and Save. Be sure to enter “www” before the domain name as shown, I’ll explain why later.
Google Domain DNS Settings
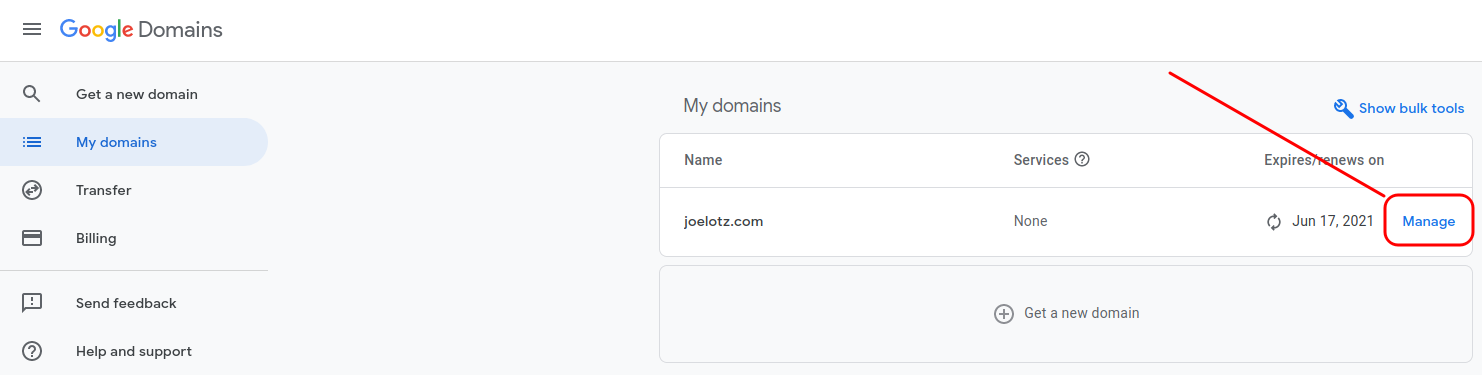
Now go to Google Domain and select “Manage” next to the domain name.
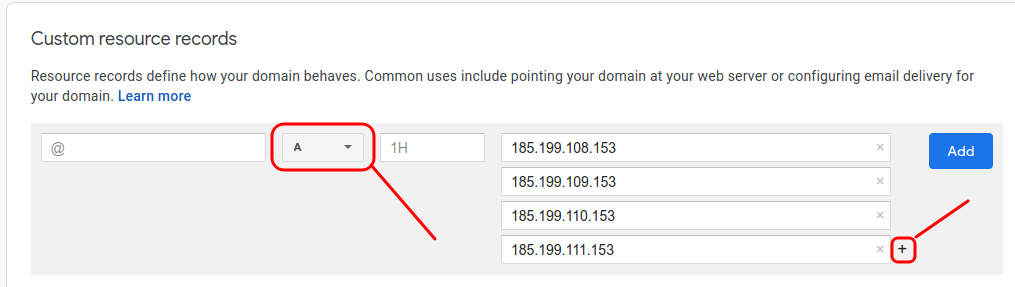
Next click the “DNS” option on the left-hand menu and we are ready to make some entries. The first is a DNS ‘A’ record or ‘address’. This is the most fundamental record and indicates the IP address of the domain, in this example, of joelotz.com.
Scroll down the page until you see the section “Custom resource records”. Most likely it is already set to ‘A’, if not, just click the drop-down and set it. To begin with you won’t see the IP addresses, you need to add those. What we are doing here is telling all the DNS servers, “if someone comes looking for joelotz.com go to one of these four server addresses (which are at github).” These IP address come from the github docs. Enter an address and click the + sign to get another row. Once all four are entered hit the ‘Add’ button.
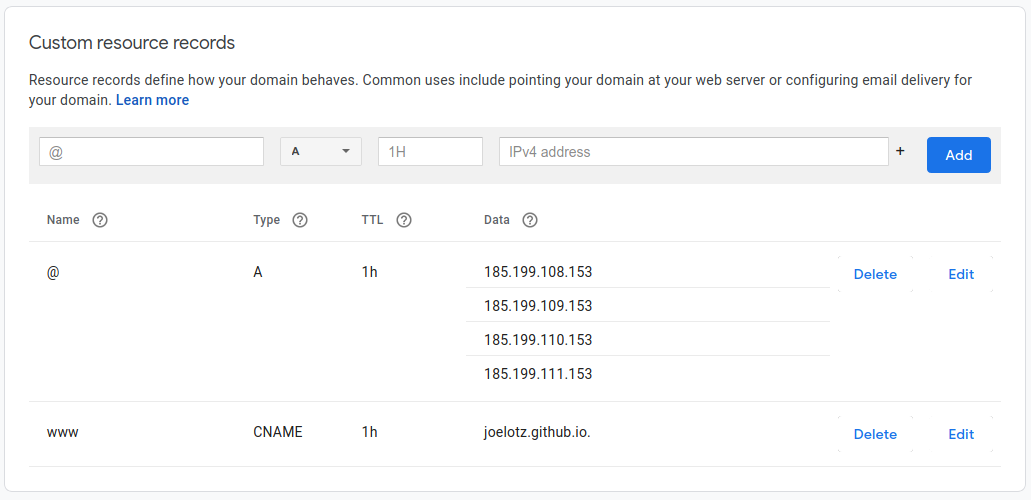
Next, I don’t just want to forward traffic from joelotz.com to joelotz.github.io, I want the address to actually be joelotz.com. For this, we need to create a CNAME Record. This creates an alias from one domain name (joelotz.github.io) to another (joelotz.com).
In the same section as before, change the drop-down from an “A” to “CNAME”. Then add “www” to the far left field and your github pages address to the far right.

This is what it should look like when completed.
I found it takes about 5 minutes for this information to propagate, so go grab an iced tea, you deserve it. For those extra-nerdy, you can verify that records are set by typing:
dig <domain> +nostats +nocomments +nocmdThis command will perform a DNS lookup and display the answers that are returned from the name server(s). There is a bunch of fluff that is hidden with all the +no flags.

Encrypted Traffic
And now a statement on security and privacy, which are related but not the same… it is ridiculously easy to “see” what you are doing on the internet. This is currently used by all types of people, governments and large companies, to collect your data and information. The most easiest method of keeping your traffic private is to encrypt it. To do that you must browse the https version of a site, but first you must have an https encrypted version.
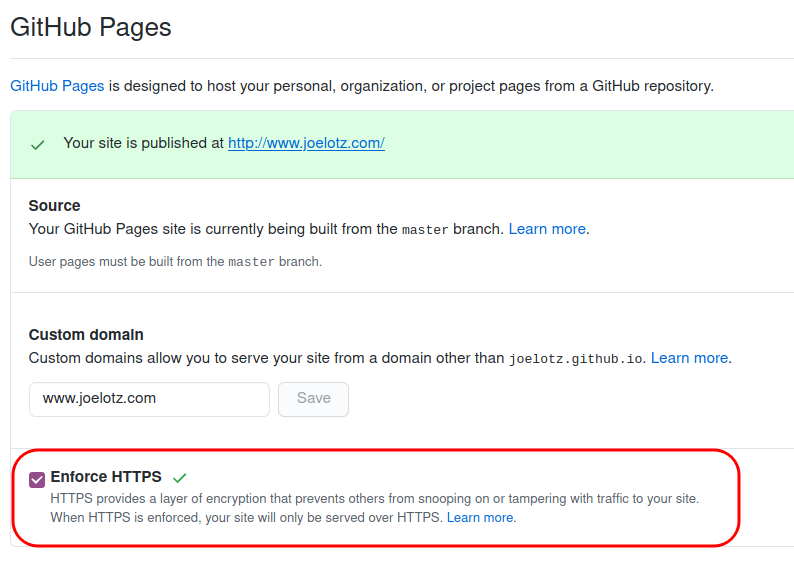
Now that the DNS records are entered and propogated, go back to github pages repository. Scroll down until you see and then select “Enforce HTTPS”. According to Monarch Wadia,
Your github repo settings’ “Custom Domain” field *HAS to have “www” in it,* and it HAS to have “Enforce HTTPS” checked!
[https://medium.com/@monarchwadia/github-pages-setting-up-www-subdomain-with-ssl-https-aca9eca371d6](https://medium.com/@monarchwadia/github-pages-setting-up-www-subdomain-with-ssl-https-aca9eca371d6)
This is why I had you use “www” in front of your domain name way back in step 1. If I didn’t then https://joelotz.com would work but https://www.joelotz.com would result in a Certificate Invalid error.
Update - 2020/11/14
This may be obvious to some of you, but I wanted to point something out that gave me some hassle. I use Pelican static-site generator to create my blog. When I generate the html files from markdown it completely erases the “output” folder and re-builds the blog. From there, I push the output folder to the github master branch to be served. The problem is… was… that I was blasting away the CNAME file that was created in github. I assume this problem exists with Jekyll or other static-site platforms. The solution I found was to either have Pelican create this file as a static page when generating the blog. There are probably other solutions, but this worked for me.
First, tell Pelican where to find the static file “CNAME”. Add these options to pelicanconf.py file:
STATIC_PATHS = ['extra/CNAME']
EXTRA_PATH_METADATA = {'extra/CNAME': {'path': 'CNAME'},}
Or if you already have STATIC_PATHS, like an image folder, it would look something like this:
STATIC_PATHS = ['images', 'extra/CNAME']Now create a directory in the blog’s content folder named extra and in that folder a file named CNAME as described above. When you generate the blog, i.e. pelican content -o output -s pelicanconf.py the file CNAME will be copied into the output folder. And more importantly when you push the output folder to github it won’t blast your CNAME file.
Software Versions
This is an automated list of software versions used during the writing of this article.
Software Version OS Ubuntu 20.04 LTS Pelican 4.5.4